
That Was Intense!! …But Was It Really?
Posted in Announcements Blog Fitness Fitness & Wellness Corner News
By Christie Tippett, Assistant Director of Fitness
October Fitness & Wellness Corner
How do we know if something was intense? What does ‘intense’ even mean? How can we actually measure our intensity during our workouts? Let me lay it out for you, friends!
Intensity is defined as “the level of demand that a given activity places on the body” (McGill et. al, 2019). Intensity is not measured by how sweaty you are during the workout, or how long you have been working out. Intensity can, however, be observed a number of ways including monitoring heart rate (HR), calculating a percentage of maximal oxygen consumption (VO2max), calculating your 1-repetition max, ratings of perceived exertion (RPE) scale, a talk test, and the Dyspnea scale. Below you will find the most commonly used methods for measuring intensity during workouts.
1. Heart Rate (HR)
The first method we are going to discuss is your target heart rate (THR) training zones. This method has 3 main training zones: Zone 1 (builds aerobic base and aids in recovery), Zone 2 (increases aerobic and anaerobic endurance), and Zone 3 (builds high-end work capacity) (McGill et. al, 2019).
In order to find your THR zones, one would first have to find their resting heart rate (RHR). How do you measure your resting heart rate? Well, many have the widgets and whoozits that do the work for us (I’m talking about smart watches, chest straps, and other HR monitors of course), but the awesome thing about your heart rate is that you don’t need any additional technology to measure it; All you need are your fingers and your carotid or radial artery (yes, you have those already). Your carotid artery is located on your neck, just to the side of your larynx, and your radial artery can be found on the underside of your wrist, closer to your thumb. Gently place your index and middle finger over the artery, and you should begin to feel your pulse. Have a clock handy, and count the number of times you feel your ‘beat’ in a 10-second window (this can take practice). Once the 10 seconds are up, multiply your counted beats by 6 (10 seconds x 6 = 60 seconds or 1 minute) and voilà! You just measured your beats per minute!
Once you have your RHR, you can then find your THR zones! A common method in doing this is through the straight percentage method. This method is rather simple, as you just have to find your age-predicted max heart rate, which can be done by subtracting your age from 220. For example, a 20 year old’s age predicted max heart rate (APMHR) is 200 beats per minute (220 – 20 = 200). Once you have your APMHR, you would then multiply the estimated HR max by the appropriate intensity. To put it into perspective, if I would like to work in Training Zone 2 to increase my aerobic endurance, I would work at 76-85% of my APMHR. Furthermore, if my APMHR was indeed 200bpm, I would then want to ensure that my heart rate stayed between 152 bpm and 170 bpm (200 x .76 = 152, 200 x .85 = 170).
How to find the intensity percentages in each training zone:
• Zone 1: Maximal HR x .65 | Maximal HR x .75
• Zone 2: Maximal HR x .76 | Maximal HR x .85
• Zone 3: Maximal HR x .86 | Maximal HR x .95
2. Ratings of Perceived Exertion (RPE)
This method is a personal favorite of mine, as I have had extensive training on this scale due to utilizing it all throughout my college career in my exercise physiology labs! This technique is subjective based on an individual’s overall physical sensations, including an increased heart rate, sweating, and muscle fatigue. Once you have a good sense of your own body, this scale proves to be pretty accurate! There are actually two different versions, the first being the Borg’s scale, and the second being the 0-10 RPE Scale. See pictures below:
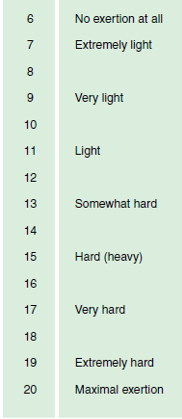
This scale starts at the number 6 (equal to no exertion at all, or, a resting state), and goes all the way up to 20 (maximal exertion – you won’t be here long at all because you physically cannot sustain this amount of exertion). The cool thing about this scale is that you can just add a zero to the number, and that is roughly where your heart rate should be. For example, say you were at a 6 on the 6-20 scale, you would add a zero to it, making it 60. At rest, where there is no exertion at all, your heart rate should roughly be at 60 beats per minute (bpm). Another example is if you say you are feeling like you are at a 17 (very hard); add a zero, and your heart rate should roughly be around 170 bpm! Please be advised that this is for the general population and can vary depending on your physical fitness level.
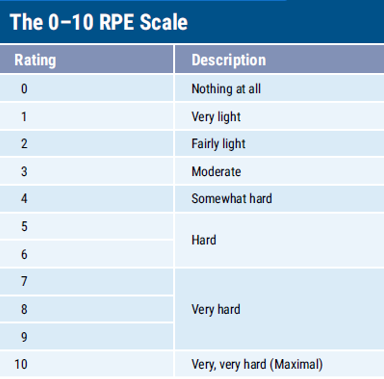
Many people like this modified version of the RPE scale, as a 0-10 scale is commonly used for many instances in our everyday lives. As you can see, saying you are at a 0 would indicate you are at a resting state, and a 10 would signify you are exerting maximal effort. There is not a conversion to your HR on this one, but again, many people find a 0-10 scale more relatable and user-friendly!
3. The Talk Test
This test is a self-evaluation of intensity associated with the ability to talk while exercising. I like to encourage beginner’s to use this method to measure their intensity. I will typically say, when you are working out, if you are able to hold a conversation with a neighbor, we know the intensity is low; If you are a little breathless while talking, you are working at a moderate intensity. Finally, if you have to catch your breath while trying to say a sentence, we know you are working at a high intensity. If you find that you cannot talk all all, this may be an indicator that the intensity is too high (McGill et. al, 2019).
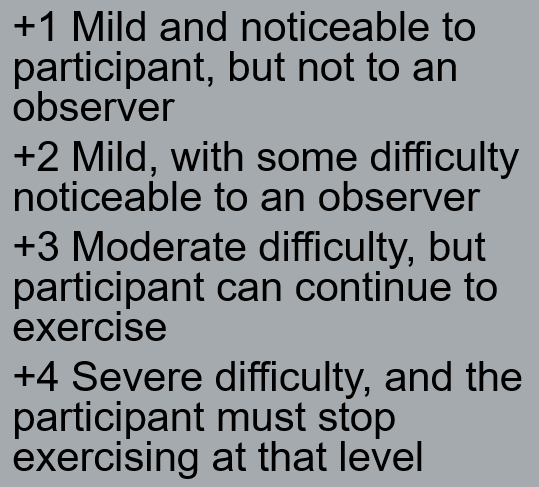
4. The Dyspnea Scale
Similar to the Talk Test, this one relates to one’s breath. This scale is subjective, and allows participants to perceive the intensity by their level of difficulty breathing. This sounds scary, but I promise it isn’t! Below you can see the scale, as it is pretty self-explanatory. This scale is especially helpful for those who have pulmonary conditions such as asthma or emphysema, or feel limited because of breathing difficulties (McGill et. al, 2019). It is suggested that this scale be used in conjunction with RPE and HR. As expected, individuals should reduce intensity should they find themselves at a +4 on the scale.
5. 1-Repetition Maximum
- This last method is a favorite among avid weightlifters. I suggest using this once you are considered experienced. Intensity is measured as an individual’s level of effort in comparison to their maximal effort (McGill et. al, 2019). Your 1RM is the maximum amount of weight you can move during an exercise, completing the repetition successfully. How do you know if it is truly your 1RM? Let’s put it this way – if it was just 1-2 pounds heavier (which you would try during testing), you would fail and be unable to complete the repetition. Ideally, you would test your 1RM when you find that the weight you have been moving isn’t as challenging for you any longer. Be sure you have a spotter while testing your 1RM for your lifts, as you do incrementally increase the weight until failure. Again, the last amount of weight lifted with no assistance for one full repetition is your true 1RM. Please keep in mind that there are proper procedures for this and one must plan for optimal recovery time between lifts. A good source on how to discover your 1RM can be found here.
Once you establish your 1RM, you would then work at a percentage of said max throughout your weightlifting program; This would be dependent on your specific training goals. Accordingly to McGill et al (2019):
- Muscular endurance and stabilization is best developed with a training intensity of 50-70% of 1RM
- Hypertrophy is best achieved by training with 75-85% of 1RM
- Maximal strength adaptations require training with 85-100% 1RM
- Power (high-velocity) adaptations are best attained with 30-45% of 1RM when using conventional weight training, or approximately 10% of body weight when using medicine balls
For example, if my 1RM on squat was 200 lbs, and I wanted to increase my muscle growth (hypertrophy), I would work at an intensity of 75-85% of my 1RM (200 lbs x .75 = 150; 200 lbs x .85 = 170 lbs). This means that I would squat between 150 and 170 pounds for 6-12 repetitions. Finding your 1RM is empowering, but can be pretty time-consuming!
Things to Remember
There you have it! We’ve discussed five different methods of monitoring your intensity for your workout. We’ve talked about heart rate training zones, physical exertion, monitoring via breath and talking, and then the lifter’s favorite, 1RM. I encourage you to explore these options and see what works best for you. As previously mentioned, the methods above are general and can vary depending on one’s physical fitness level in addition to other external variables (i.e. how you are feeling that day, how much sleep you got the night prior, if you fueled your body sufficiently in preparation, etc). I hope you learned something new and that you begin to monitor your intensity so you can hold yourself accountable and see progression within your workout regimens!
References:
- Jimenez, C. (2018, October 19). Understanding 1-RM and Predicted 1-RM Assessments. Retrieved September 25, 2020, from https://www.acefitness.org/fitness-certifications/ace-answers/exam-preparation-blog/2894/understanding-1-rm-and-predicted-1-rm-assessments/
- McGill, E. A. (2019). Principles of group fitness instruction. Burlington, MA, MA: Jones & Bartlett Learning.
This blog post was written to provide educational information only. This article should not be used as a substitute or a replacement for professional medical advice, diagnosis, or treatment. If you have questions or concerns about your personal health, you should always consult with your physician. It is recommended that you consult with your physician or health care professional before beginning any fitness regimen to determine if it is suitable for your needs. The use of any information provided by this article is solely at your risk.